In our first three lessons you learned to improvise over the first three chords to Song for My Father using the IFR Tonal Map concept. (To start at the beginning of this lesson series please click the link below.)
(Click here for lesson #1 on "Song for My Father".)
The fourth and final chord in the song: the 3D chord
In today's lesson we are going to learn to improvise over the 3D chord (pronounced "three dominant chord") which is the final chord we need to master in order to improvise with complete freedom over the entire song. Remember that for this song we are building our tonal map in the key of Ab:

*Note to transposing instruments: please refer back to lesson 1 in this series for the explanation of how to transpose these notes for your instrument.
Just like you saw in the last lesson on the 4D chord, the 3D chord also produces a slight alteration to the original harmonic environment of the song. The result is a beautiful sound that creates a lot of tension just before returning to the 6- chord. Below is a drawing of the altered scale produced by the 3D chord:

What a strange looking scale! This the first scale we have seen which includes an interval larger than the whole step. That large interval jump of three half steps between notes 4 and #5 is what gives this scale it's distinctive sound which you will recognize right away. Don't worry right now about understanding why the 3D chord produces this exotic scale. (You'll learn this in Improvise for Real.) Right now, our only task is to start getting to know these sounds and learn to express our own music with them.
Playing activity #1
Practice improvising over this jam track using just the notes that you see in the drawing above. At first you should stay in just this one octave because this will help your ear to feel note 3 as your tonal center. But once you start to feel oriented in the key of the music, feel free to move beyond the octave and improvise with these notes across your entire musical range. This is a harmonically complex scale which has many important lessons to teach you. So take time to really explore the sounds and discover the music you can create with them.
The notes of the 3D chord
Now let's look at the chord notes. The notes of the 3D chord are 3, #5, 7 and 2. Let's circle all of these notes so that we can see them more clearly:

Playing activity #2
Just like we did in lessons 1, 2 and 3, now we are going to practice alternating between improvising with the entire scale and improvising with just the chord notes. Here's how the exercise works:
1) Begin by playing the entire scale from note 3 at the bottom to note 3 at the top. Improvise freely with all of these sounds for a few minutes.
2) Now limit yourself to JUST the chord notes. Improvise for a minute with just the notes 3, #5, 7, 2 and 3.
3) Now we're going to alternate between steps 1 and 2. You could start by improvising for a couple of minutes with just the chord notes to really burn the sensation of the 3D chord into your mind. Then improvise for a few minutes with all of the notes of the scale, and notice how the full color of the harmonic environment comes to life, especially when you play note 4 which creates that beautiful half-step tension relative to note 3 at the bottom.
4) Finally, strive to integrate these two levels of awareness at the same time. Improvise freely with the entire scale as you did in step 1, but now try to maintain your awareness of the chord notes that you explored in step 2.
Visualizing the 3D chord within the tonal octave
Just like we have done in earlier lessons, our final step is to integrate our new knowledge of the 3D chord back into our overall vision of the tonal octave. When we limit our focus to just one octave with note 1 at the bottom, the notes of the 3D harmonic environment appear as follows:

Playing activity #3
Before trying to improvise over the entire song form to Song for My Father, let's take a few minutes to practice this new tonal vision of the 3D harmonic environment.
1) Begin by playing the entire scale in the drawing above from note 1 at the bottom to note 7 at the top. Improvise freely with all of these sounds for a few minutes. (Remember to respect the notes in the drawing above. Don't forget to use #5.)
2) Now limit yourself to JUST the chord notes. Improvise for a minute with just the notes 2, 3, #5 and 7.
3) Now alternate between steps 1 and 2. Improvise for a couple of minutes with just the chord notes and then improvise for a couple of minutes with all seven notes of the scale. Go back and forth many times.
4) Finally, strive to integrate these two levels of awareness at the same time. Improvise freely with the entire scale as you did in step 1, but now try to maintain your awareness of the chord notes that you explored in step 2.
Putting it all together
This is the moment when I think you will really begin to appreciate the value of the work you have done until now. There are just four chords in the chord progression to Song for My Father. And since you have already learned to visualize all four of these chords within any octave on your instrument, you already have everything you need to improvise freely over the entire song, knowing exactly how to access the notes of each chord whenever you want to. So now we are going to practice doing exactly that.
Playing activity #4
Start by taking a few minutes to carefully study the drawing below. This simple drawing actually contains a great deal of harmonic information and music theory, but presented in a way that is extremely compact and empowering to the improviser.

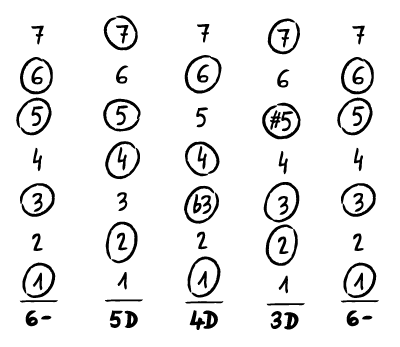
1) In order to make sure you have all of these sounds at your fingertips, try improvising with just the chord notes in each of the chords shown above. For example, start in the 6- chord and play just the notes 1, 3, 5 and 6. After improvising with these sounds for a minute or so, move on to the 5D chord and use only the notes 2, 4, 5 and 7. Then move on to the 4D chord and improvise with the notes 1, b3, 4 and 6. Then move on the to 3D chord and notes 2, 3, #5 and 7. And then finish by advancing to the final 6- chord in the progression, improvising with just the notes 1, 3, 5 and 6.
2) Can you feel the harmonic progression as you cycle through the chords? By limiting yourself to just the chord notes in each moment, you are performing two roles at once. As a soloist you are improvising phrases with these notes and telling a melodic story. But you are also acting as your own accompanist because at each moment of the chord progression you are putting just the chord notes into the air, and this helps your ear to feel the overall harmonic progression as the chords change.
3) Once you are feeling this harmonic progression very clearly, you can move beyond this limitation of playing just the chord notes. Now include the other notes of the scale in your improvisations. You should still be cycling through the chords one by one, but at each stage you should improvise freely with the entire seven-note scale shown in the drawing above.
Let's play Song for My Father!
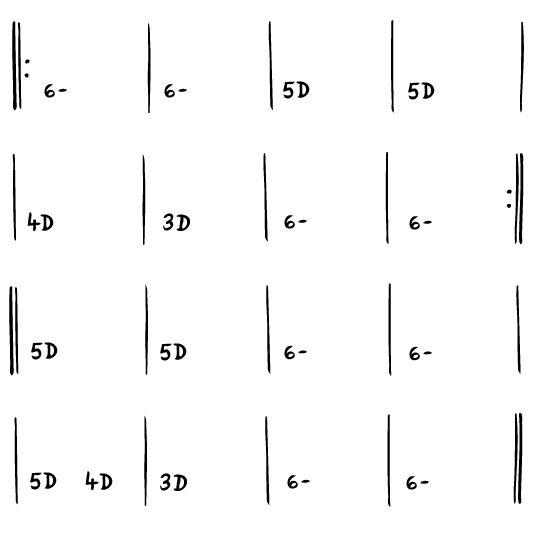
Now take a few minutes to study the chord progression shown below. This is the complete chord progression to Song for My Father, expressed in the IFR tonal language that you have been using throughout this lesson series. As a first step, I recommend that you listen to the jam track and simply follow along in the drawing below. Make sure you can follow the entire chord progression to the song with your eye as you listen to the jam track. (Note the repeat symbols around the first two lines of the song. This is the A section of the song which is repeated before advancing to the B section represented by the following two lines.)

Practice tips:
1) Start by just listening and following along in the tonal sketch. It's much easier to hear and recognize the chord progression if you aren't distracted by trying to also improvise a solo at the same time. So before picking up your instrument, make sure you understand the drawing above and that you can hear this chord progression in the accompanying jam track. Investing just a few minutes at the beginning to really clarify these sensations in your mind will save you hours of frustration later on. So don't rush into playing just yet. The first step to improvising with confidence is to be perfectly at ease with the harmony and the song form. So this first activity of just listening to the jam track and following along with your eye is the most important step of all.
2) Then practice playing just the chord notes. Whenever you're ready to start playing, you can begin by improvising over the entire song form using JUST the chord notes in each measure. This is one of the fastest ways to gain confidence and control for a couple of reasons. First, it imposes a level of discipline on you because you need to know exactly where you are in the song in order to correctly play just the chord notes. And second, it gives you an opportunity to hear the chord notes at each moment in the song and this will help to sensitize your ear to the melodic possibilities that these notes offer. So even though it might feel a little artificial at first, make an effort to improvise over the entire song form using just the chord notes in each measure.
3) Now expand to using the entire scales. When you are feeling confident with both the overall song form and the individual chords in the progression, you can move on to the next step which is to allow yourself the entire seven-note scale that corresponds to each chord in the progression. At first I suggest you limit your focus to the tonal octave like you practiced in Playing Activity #4. This will help you build a sense of security and orientation. Remember that even though you are now using all seven notes of the scale, these notes do not remain constant throughout the entire progression. Whenever the 4D chord appears the scale becomes altered to include the note b3. And whenever the 3D chord appears the scale becomes altered to include the note #5. Make sure to respect these harmonic changes in your improvising so that you can align your music with the underlying harmony of the song.
4) Finally, put all this knowledge aside and play from your own imagination. The activities and exercises that we have gone through in this lesson series were intended to help you get to know the sounds that comprise the harmony to Song for My Father. Understanding these sounds and learning to create them effortlessly in your music is the first step to improvising freely over this song. But you shouldn't get the idea that the notes we have been studying are necessarily the "right notes" or the only notes that you should play. The highest level of improvising over any song is to free yourself from all constraints and play directly from your imagination. So as you gain confidence flowing with the harmony of Song for My Father and creating these sounds in your own music, I encourage you to continually branch out, to always consult your own imagination without fear of deviating from the underlying harmony. This creative freedom is what makes musical improvisation so fascinating because your possibilities are truly infinite.
Where to go from here
If you like this approach to learning jazz standards, you should check out our IFR Standards Workout series. For each jazz standard you get a complete lesson like you saw in this free lesson series. This includes a complete IFR harmonic analysis, creative insights, practice tips and backing tracks in all 12 keys.

