In our last lesson you learned to build the IFR Tonal Map anywhere on your instrument and you used the tonal map to study the sounds of the 6- chord. This is the first of four chords that appear in Song for My Father. (If you haven't seen that lesson, please click the link below to see it.)
(Click here for lesson #1 on "Song for My Father".)
Taking the next step: the 5D chord
In today's lesson we are going to learn to use the IFR Tonal Map to create the next chord that appears in the song, which is the 5D chord (pronounced "five dominant chord"). Remember that for this song we are building our tonal map in the key of Ab:

*Note to transposing instruments: please refer back to lesson 1 in this series for the explanation of how to transpose these notes for your instrument.
The 5D chord that we are going to study today is one of the seven original chords of the major scale, which means that all of the notes of this chord are already right there on your tonal map. Because note 5 is the root of this chord, let's reorganize our tonal map to place note 5 at the bottom and also at the top. This helps us to visualize what we call the "fifth harmonic environment" of the major scale, and these are the sounds that we will be exploring today.

Playing activity #1
Practice improvising over this jam track using just the notes that you see in the drawing above. At first you should stay in just this one octave because this will help your ear to feel note 5 as your tonal center. But once you start to feel oriented in the key of the music, feel free to move beyond the octave and improvise with these notes across your entire musical range.
The notes of the 5D chord
Now let's look at the chord notes, and see exactly where each note of the 5D chord falls on our tonal map. The notes of the 5D chord are 5, 7, 2 and 4. Let's circle all of these notes so that we can see them more clearly:

Playing activity #2
Just like we did in lesson #1, now we are going to practice alternating between improvising with the entire scale and improvising with just the chord notes. Here's how the exercise works:
1) Begin by playing the entire scale from note 5 at the bottom to note 5 at the top. Improvise freely with all of these sounds for a few minutes.
2) Now limit yourself to JUST the chord notes. Improvise for a minute with just the notes 5, 7, 2, 4 and 5.
3) Now we're going to alternate between steps 1 and 2. You could start by improvising for a couple of minutes with just the chord notes to really burn the sensation of the 5D chord into your mind. Then improvise for a few minutes with all of the notes of the scale, enjoying the more subtle shades of color that you find in the non-chord notes.
4) Finally, strive to integrate these two levels of awareness at the same time. Improvise freely with the entire scale as you did in step 1, but now try to maintain your awareness of the chord notes that you explored in step 2.
Practice tip
As you improvise, listen closely to the sound of each note and remember where each sound is located so that you can play with intention, expressing each sound exactly as you hear it in your mind. Notice how the chord notes produce a sensation of relaxation while the non-chord notes produce a feeling of tension against the overall harmonic environment that you are creating. Take time to appreciate the unique sensation produced by each note. If you listen closely, the notes themselves will inspire unlimited melodies for your improvisation.
Playing activity #3 (advanced)
Ready to take your practicing to the next level? If so, then let me show you where all of this is actually leading. Until now we have been limiting our creative explorations to just one octave, because that's an easy way to help your ear feel one particular note as the tonal center. For example, when you limit yourself to just one octave with note 5 at the bottom and also at the top, this helps your ear to feel note 5 as the tonal center. Whenever you do this, what you are really exploring is what we call the "fifth harmonic environment" of the major scale.
But this technique of limiting ourselves to just one octave isn't the only way to feel these different harmonic environments. In a live playing situation, the way we create the feeling of a particular harmonic environment is through the use of chords. With the chord sounding in the background, you can improvise freely across your entire musical range without ever losing the feeling of the harmonic environment. This is what we are going to practice now.
1) The first step is to extend the IFR Tonal Map across your entire musical range. Remember that we are building our tonal map in the key of Ab which leads to the following notes:

Now try extending this same tonal map over a span of TWO octaves:

You might not have enough musical range to play the entire major scale in two full octaves. That's perfectly fine. Right now we're just trying to understand the concept of extending the tonal map over our entire musical range, whatever that happens to be. Most likely your comfortable range is not going to coincide perfectly with the Ab major scale, so your vision of the tonal map in this key might look something more like the following:

This is the vision that we need to get used to. We want to free ourselves from the notion that the tonal map "begins" on a certain note and "ends" on another note. Instead you want to imagine the IFR Tonal Map across your entire musical range. Wherever you happen to run out of range, that's perfectly fine. But take a moment right now to practice improvising in the key of Ab across your entire useable range.
2) Likewise, we can also imagine any chord to be extended across our entire musical range. The notes of the 6- chord which we studied in the last lesson are 6, 1, 3 and 5. So take a moment to practice improvising with just these chord notes extended across your entire musical range:

3) The notes of the 5D chord that we studied today are 5, 7, 2 and 4. So now take a moment to practice improvising with just these chord notes extended across your entire musical range:

Visualizing chords within the tonal octave
Now I want to show you a different view of these two chords which will be even more useful to you as an improviser. We are now going to return to our original view of the octave with note 1 at the bottom and note 7 at the top, and we are going to simply observe where the notes of each chord actually fall within the octave.
This is the real purpose of the IFR Tonal Map. What we are really doing is bringing together the entire world of chords and harmony onto a single visual map of the octave. And once you understand what's going on harmonically in one octave, you automatically understand what's going on in EVERY octave, because all octaves are the same. This is why our "tonal view" of chord progressions is so powerful. Let's see how it works with the two chords we have been studying.
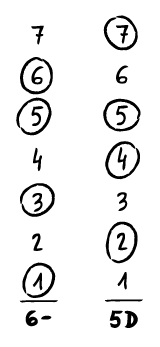
You have already learned that the 6- chord consists of the notes 6, 1, 3 and 5, and that the 5D chord consists of the notes 5, 7, 2 and 4. So now let's look at where these notes actually fall within any tonal octave:

The notes in circles represent the chord notes. You might be tempted to say that this time we are viewing the chord notes in a different order. But actually the drawing above doesn't imply any order at all. We are simply observing which of the seven notes of the scale participate in each chord.
This tonal view of the chords is especially interesting to the improviser because it allows you to see exactly what's going on around you harmonically at every moment. As you are improvising your own melodies over the first two chords to Song for My Father, the notes above indicated in circles are the most consonant notes which harmonize most simply with the musical accompaniment. So this view of the tonal octave is like a visual map of where the harmony is flowing at each moment. This is what we call the IFR Tonal Map.
Playing activity #4 (advanced)
So here is a great exercise to really take your improvisation practice for the next level:
1) For this entire exercise, I want you to limit yourself to JUST seven notes. Your entire musical range for this exercise is just the major scale from note 1 at the bottom to note 7 at the top. For this exercise, you are not even allowed to play note 1 again at the top of the octave. The entire exercise takes place with just seven notes.
2) Start by improvising for a few moments with just the four notes of the 6- chord as shown in the following drawing:

3) Now improvise for a few moments with just the four notes of the 5D chord as shown in the drawing below:

4) Now alternate between steps 2 and 3. Try improvising for two measures in the 6- chord (using just the chord notes) and then two measures in the 5D chord (again using just the chord notes). Practice this until it becomes easy and enjoyable.

5) Now comes the most advanced part. I want you to continue trying to feel the chord progression that you were playing in step 4 (two measures in the 6- chord and 2 measures in the 5D chord) but this time you are going to improvise freely with all seven notes of the scale the whole time. If you start to lose the feel of the chord progression, don't panic. Just go back to step 4 and practice alternating between the two chords until you recapture the feeling of the chord change.
Playing activity #5
Listen to the jam track and see if you can hear the chord change. It's a simple sequence that alternates between 6- and 5D, spending one measure in each. You don't necessarily have to think consciously about the chord notes in each measure. As you are improvising you can already hear exactly how each note sounds, so just listen deeply to each note and follow your own imagination. Improvise freely in the key of the music across your entire musical range.
Congratulations!
In this lesson you have taken a number of large steps forward in learning to improvise over "Song for My Father". Here is what we accomplished in this lesson:
1) You learned to play the 5D chord in a single octave with note 5 at the bottom and also at the top. This is what we call the "modal view" of the 5D chord, and it's similar to what you practiced in the last lesson with the 6- chord.
2) You then learned to extend your vision of both chords across your entire musical range.
3) Finally, you learned to visualize both chords within the tonal octave, with note 1 at the bottom and note 7 at the top. This "tonal view" of the chords is the most powerful view of all because it shows you exactly what's going on harmonically in any octave on your instrument.
 4) You even practiced soloing over the first two chords of Song for My Father, improvising freely in the key of the music across your entire musical range. You'll find many more jam tracks to practice chords 6- and 5D in IFR Jam Tracks Level 2: Pure Harmony Essentials
In the next lesson...
In part three of our series on "Song for My Father", we are going to look at the third chord of the song which is the 4D chord (pronounced "four dominant chord"). This is the first chord that requires us to use a note from outside the key of the music, so in the next lesson you will learn how that works! Just click on the link below to begin:

